HScope Guide
HScope is an Android App that allow your compact USB Oscilloscopes to become fully portable.
Read more “HScope Guide”
HScope is an Android App that allow your compact USB Oscilloscopes to become fully portable.
Read more “HScope Guide”
You can use bluetooth keyboard and mouse to control the app for example on televisions or screens with Android TV Boxes. Here is the list of keys you can use to control some of the functions:
| Key | Description |
r | Run / Stop |
m | Switch Mode (Oscilloscope / Automotive / Voltmeter) |
q | Increase Sampling Rate |
a | Decrease Sampling Rate |
| Key | Description |
| (arrow up) | Zoom In Y axis |
| (arrow down) | Zoom Out Y axis |
| (arrow left) | Zoom In X axis |
| (arrow right) | Zoom Out X axis |
| (space) | Show/Hide Controls Menu |
f | Fit Waveforms to Screen (Y axis) |
| Key | Description |
1 | Enable/Disable Channel 1 |
7 | Switch Input Voltage |
8 | Switch Input Probe |
5 | Enable/Disable Auto Voltage Selection |
z | Switch AC/DC/OFF Input Coupling |
x | Show/Hide Samples |
c | Show/Hide Stats |
i | Move Channel 1 Up |
k | Move Channel 1 Down |
| Key | Description |
2 | Enable/Disable Channel 2 |
9 | Switch Input Voltage |
0 | Switch Input Probe |
6 | Enable/Disable Auto Voltage Selection |
v | Switch AC/DC/OFF Input Coupling |
b | Show/Hide Samples |
n | Show/Hide Stats |
o | Move Channel 2 Up |
l | Move Channel 2 Down |
| Key | Description |
t | Switch Trigger Channel |
s | Switch Trigger Slope |
g | Switch Trigger Mode (Auto, Normal, Single) |
y | Trigger Level Up |
h | Trigger Level Down |
Here are the new features developed in 2023/2024 (users with the last license purchase before 2023 can activate these features through the Update 2023/2024 in the License panel).
Time unit can be set in Automotive Mode.
Duty function allows to detect variation in the duty cycle of an input waveform and so to find sudden variations or possible issues.
Possibility to record at oscilloscope high rates in Automotive mode, with paging mode.
FFT data can be exported in CSV format.
Here are the new features developed in 2022/2023 (users with the last license purchase before 2022 can activate these features through the Update 2022/2023 in the License panel).
It is possible to assign custom names to the channels. These names will be saved when the waveform will be saved, and also will be exported in the Report.
Channels signal can be inverted with the Filters.
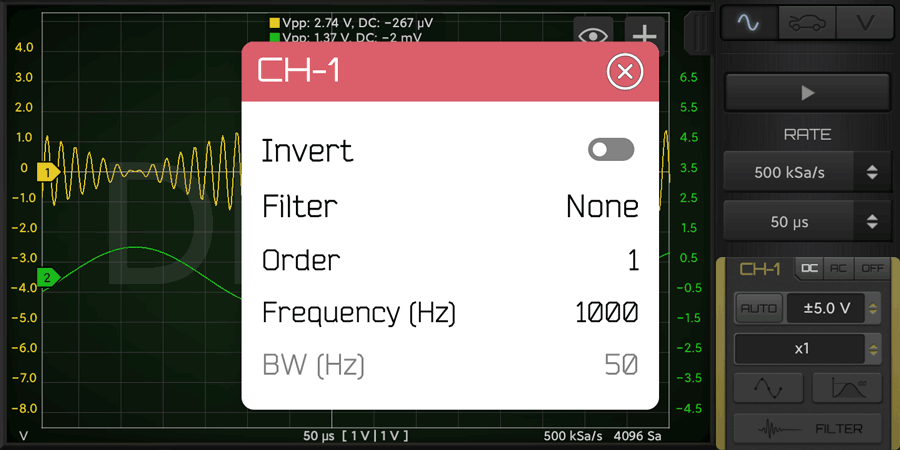
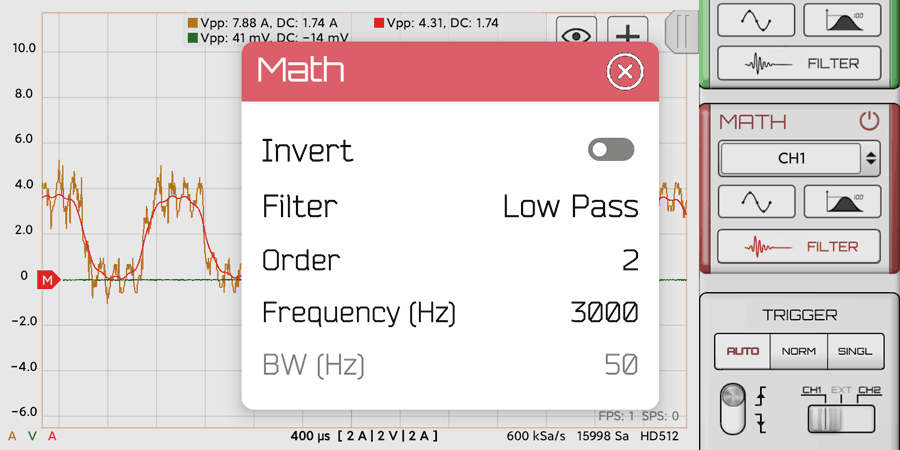
Can apply post-processing filters to the Math Channel.
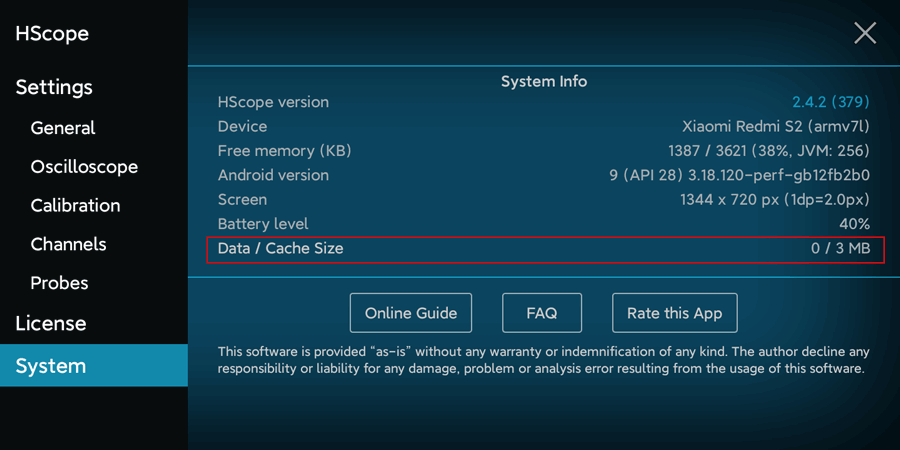
Better Cache Management to keep disk usage controlled. It is possible also to clear the cache in HScope Settings (System tab) – suggested for updates from old versions of HScope.
Here are the new features developed in 2020/2021 (users with the last license purchase before 2020 can activate these features through the Update 2020/2021 in the License panel).
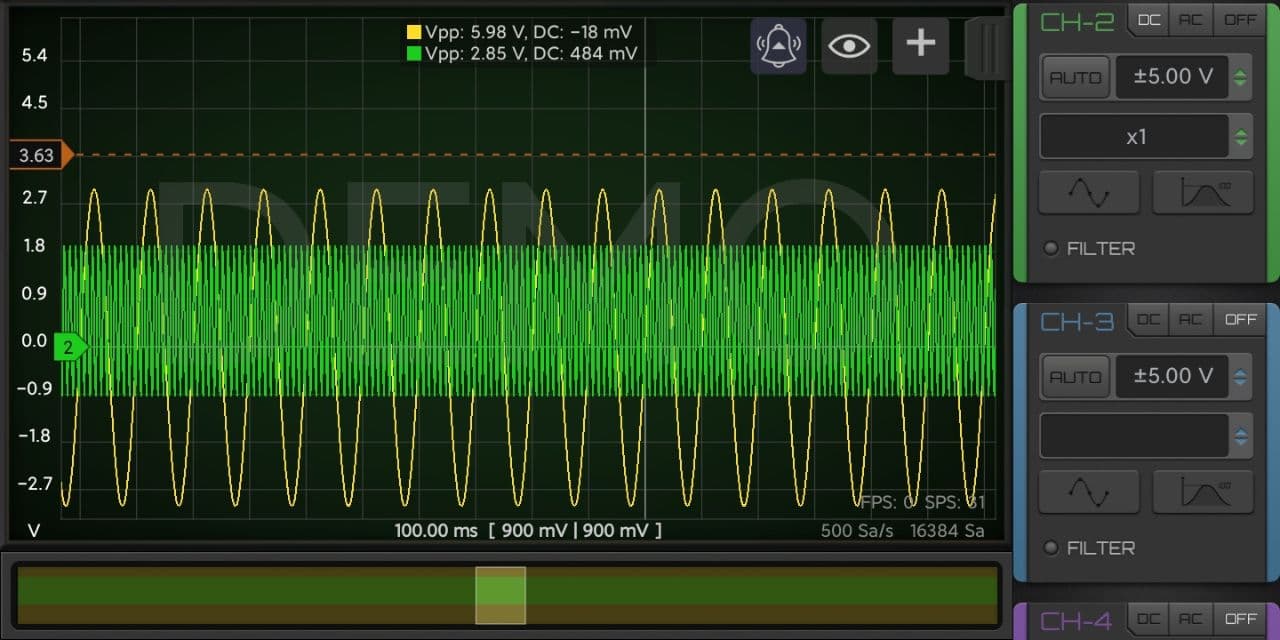
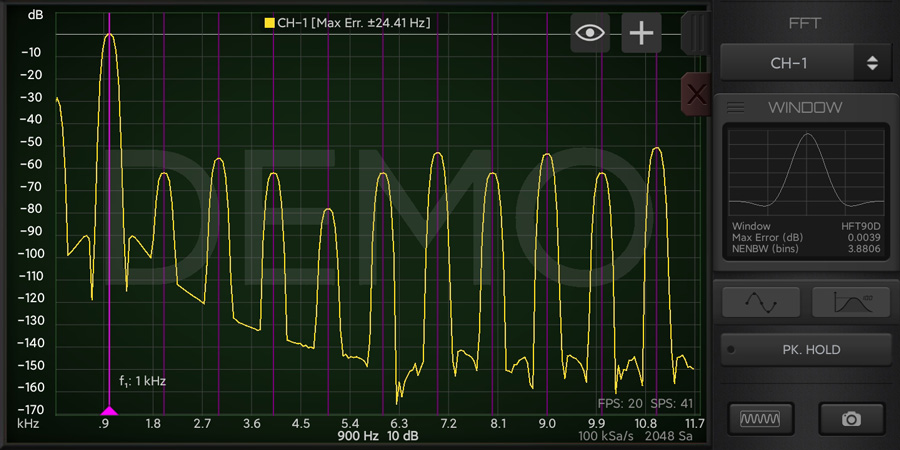
Histograms are graphical representations of data which divides it into intervals or bins. These intervals/bins are plotted on a bar chart such that the bar height relates to the number of data points inside each interval/bin as a function of the data value.
The following screenshots shows a series of typical waveforms, withthe associated histograms of the sample values in the blue bar graph.
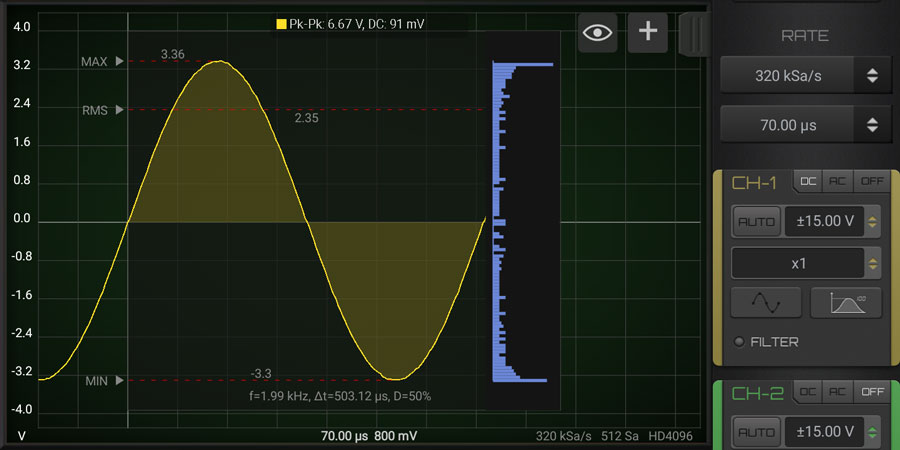
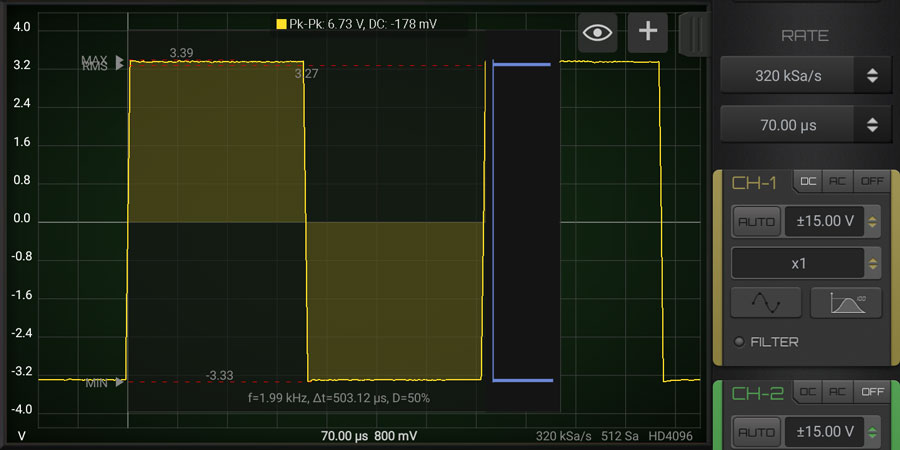
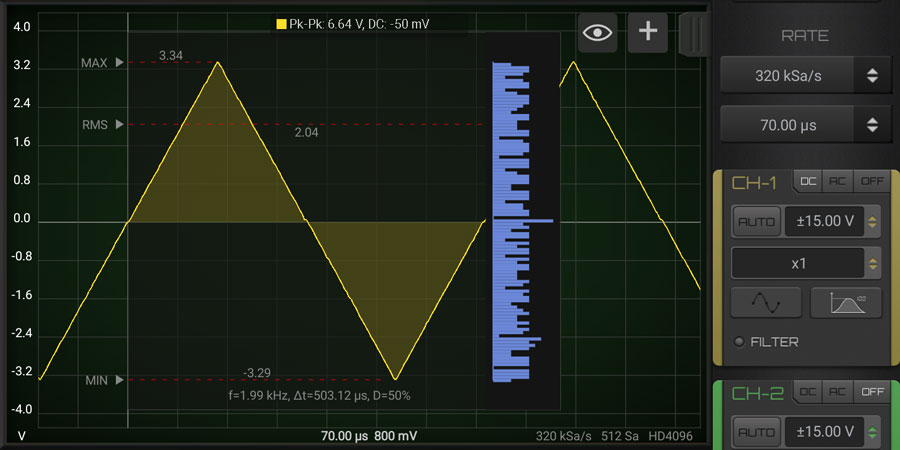
The histogram gives us an approximation of the probability density function (pdf) of a set of values. The shape of the pdf tells us about the underlying process. In the case of the sine wave, remember that the rate of change of the sine is maximum at the zero crossings and minimum at the positive and negative peaks. When we sample the waveform uniformly, we get more samples at the peaks and much fewer at the zero crossings. This is due to the differences in the rate of change, thus explaining the shape of the histogram. For the case of the triangle wave, the rate of change is constant, so samples are taken evenly. This results in what is called a uniform distribution.
Press the stats button in the channel of interest until the Histogram chart appear.
This module allow to use the output calibration pin (generally set to 1KHz square wave) to generate a PWM output signal. Max frequency and duty cycle range depends on the device (detail are in each oscilloscope page).
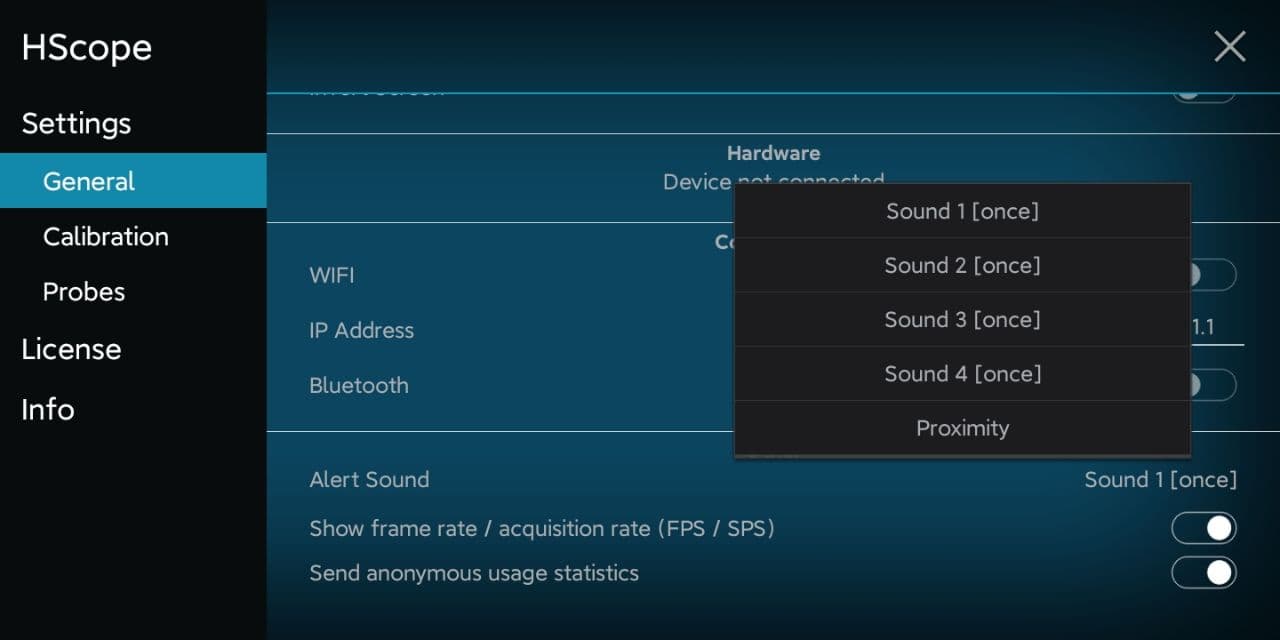
Horizontal cursors can be alarmed to produce a sound when the signal goes over or under the cursor level. When you select an horizontal cursor you can see the bell icon on the top and click it to select the kind of alarm (over / below / off).
In the settings you can select the alert sound kind.
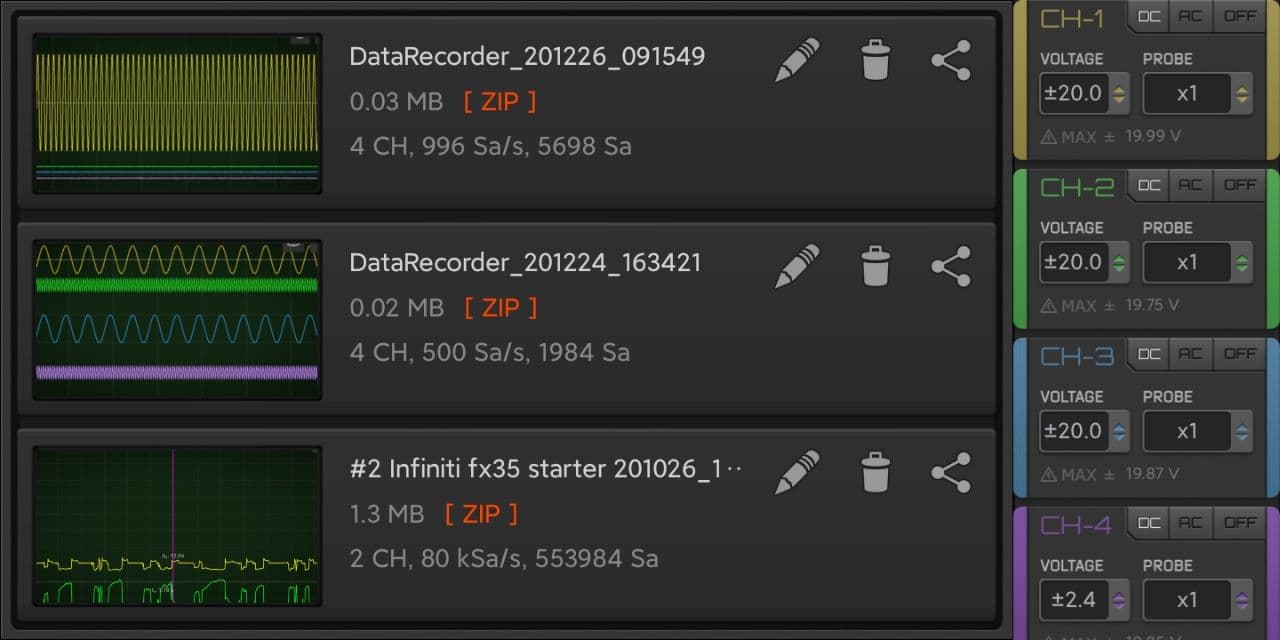
4 Channels support for Import/Export files. Currently only Hantek 1008 support 4 channels acquisition.

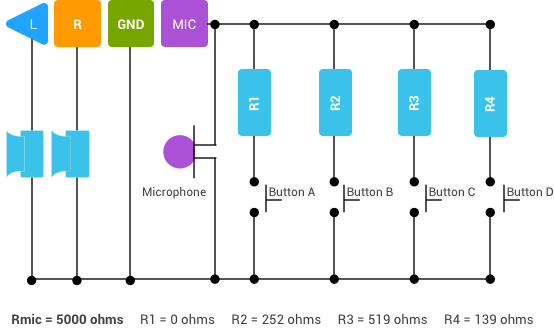
You can use the headphones (wired or bluetooth) to control some function of the app, for example during automotive recording you can press a button on the headphones and have a flag on the graph at the time of button press to remember the time when an event occured.
You can use commercial headphones (with buttons) or you can make a custom cable with up to 4 buttons.
Button functions are configurable in HScope.
In HScope Settings (General Settings) you can associate buttons from Keyboard or Headphones buttons to HScope functions.
You can have a simple headphone cable with a single button or can have a console wih up to 4 buttons. Here is the schematic to implement up to 4 buttons with an headphone cable (speakers and microphone are not required). More informations here.
You can use bluetooth keyboard and mouse to control the app for example on televisions or screens with Android TV Boxes. Here is the list of keys you can use to control some of the functions:
| Key | Description |
r | Run / Stop |
m | Switch Mode (Oscilloscope / Automotive / Voltmeter) |
q | Increase Sampling Rate |
a | Decrease Sampling Rate |
| Key | Description |
| (arrow up) | Zoom In Y axis |
| (arrow down) | Zoom Out Y axis |
| (arrow left) | Zoom In X axis |
| (arrow right) | Zoom Out X axis |
| (space) | Show/Hide Controls Menu |
f | Fit Waveforms to Screen (Y axis) |
| Key | Description |
1 | Enable/Disable Channel 1 |
7 | Switch Input Voltage |
8 | Switch Input Probe |
5 | Enable/Disable Auto Voltage Selection |
z | Switch AC/DC/OFF Input Coupling |
x | Show/Hide Samples |
c | Show/Hide Stats |
i | Move Channel 1 Up |
k | Move Channel 1 Down |
| Key | Description |
2 | Enable/Disable Channel 2 |
9 | Switch Input Voltage |
0 | Switch Input Probe |
6 | Enable/Disable Auto Voltage Selection |
v | Switch AC/DC/OFF Input Coupling |
b | Show/Hide Samples |
n | Show/Hide Stats |
o | Move Channel 2 Up |
l | Move Channel 2 Down |
| Key | Description |
t | Switch Trigger Channel |
s | Switch Trigger Slope |
g | Switch Trigger Mode (Auto, Normal, Single) |
y | Trigger Level Up |
h | Trigger Level Down |
Here are the new features developed in 2021/2022 (users with the last license purchase before 2021 can activate these features through the Update 2021/2022 in the License panel).
With this update you are going to keep/get all the provious updates:
Before the acquisition start in the the Automotive Module, now it is possible to bring to Zero the probe offset.
High visibility white theme for outdoor measurements.
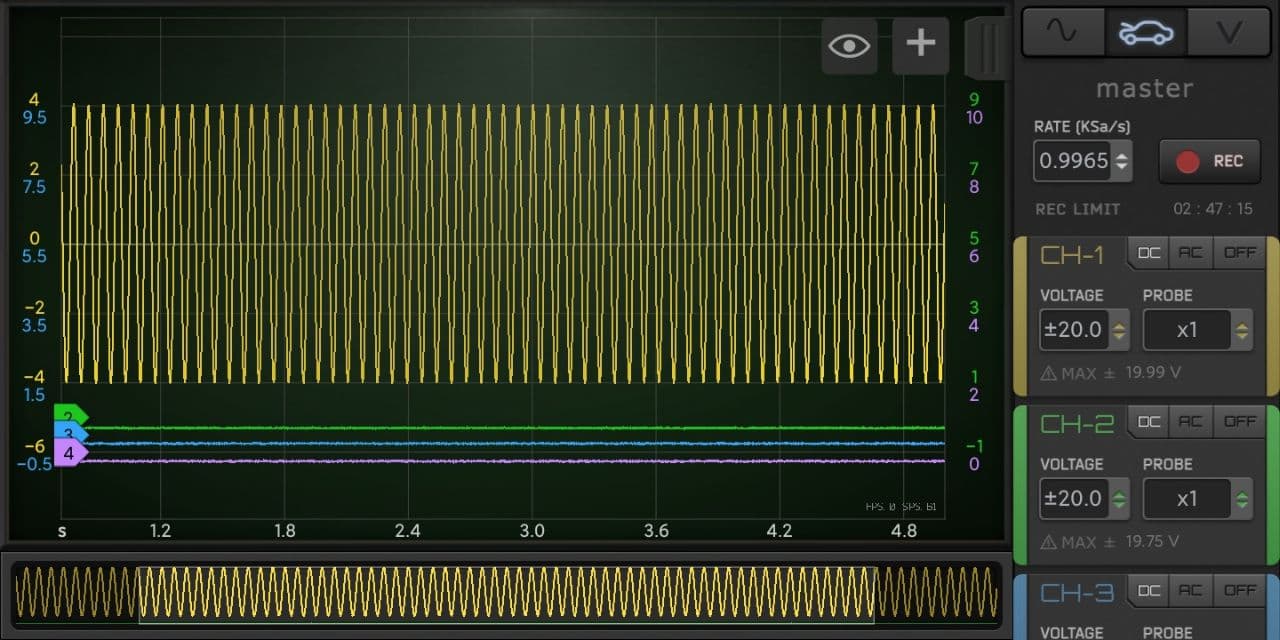
Automotive Module now support the Math Channel both on recorded or loaded waveforms.
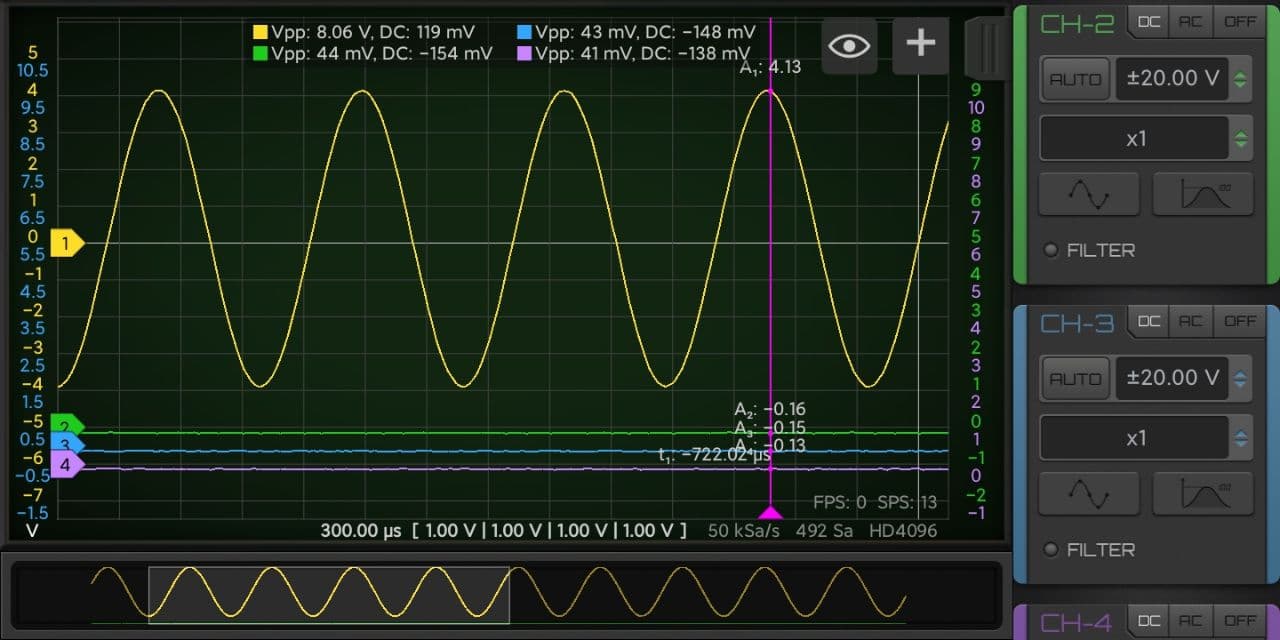
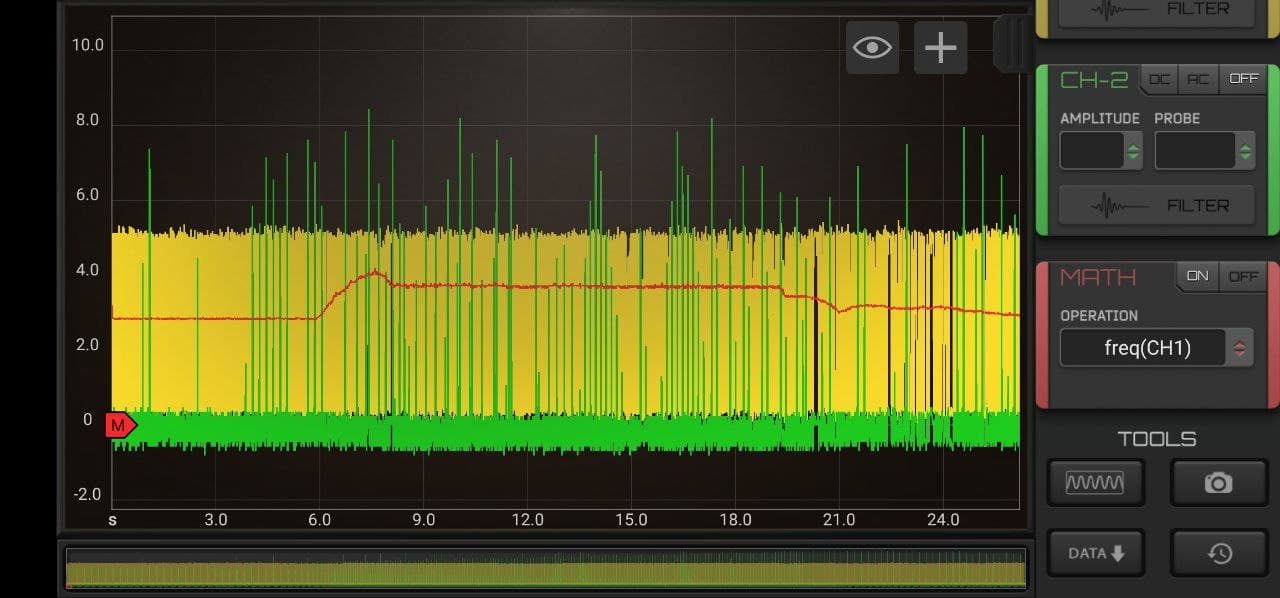
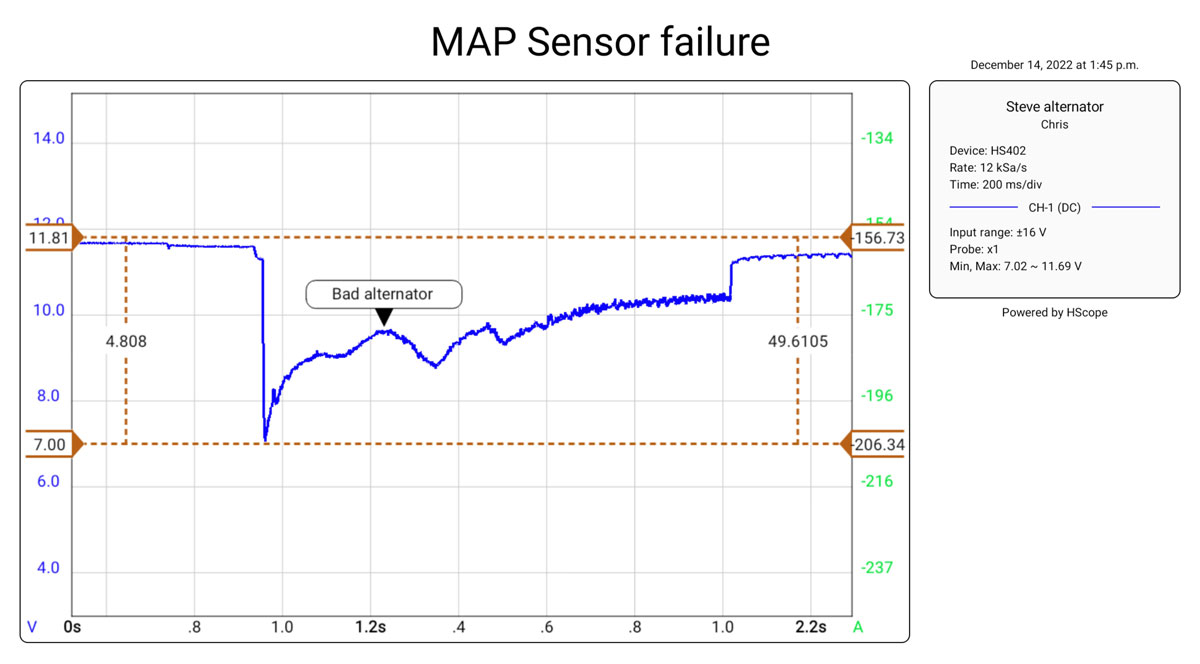
New function to compute the instant waveform frequency. Following is a sample of frequency change (in Red) with air flow from MAF sensor (which changes with engine speed).
Audio Module can now import WAV files and analyse them in HScope, process and export again as WAV.
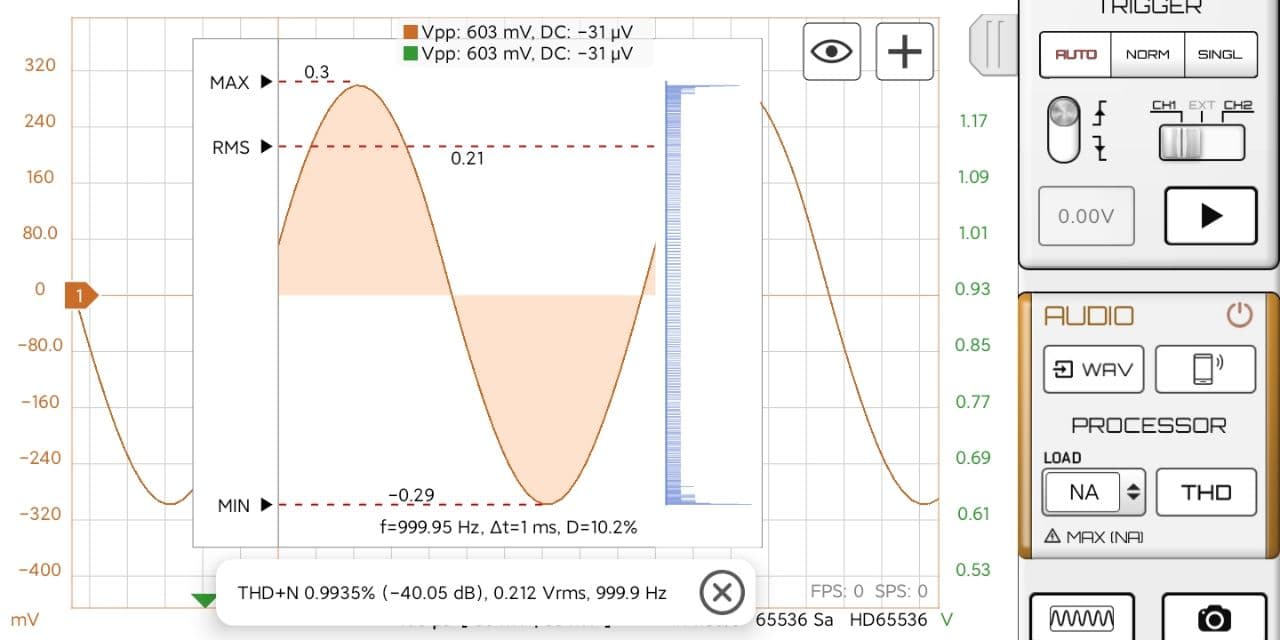
Audio Module can now calculate the (Total Harmonic Distortion + Noise) THD+N of an acquired file or an imported file.
Now you can configure the allocated RAM for Automotive Module so to use your phone full potentials!
In Oscilloscope mode the Screenshot button produce a PDF Report. The title is configurable.
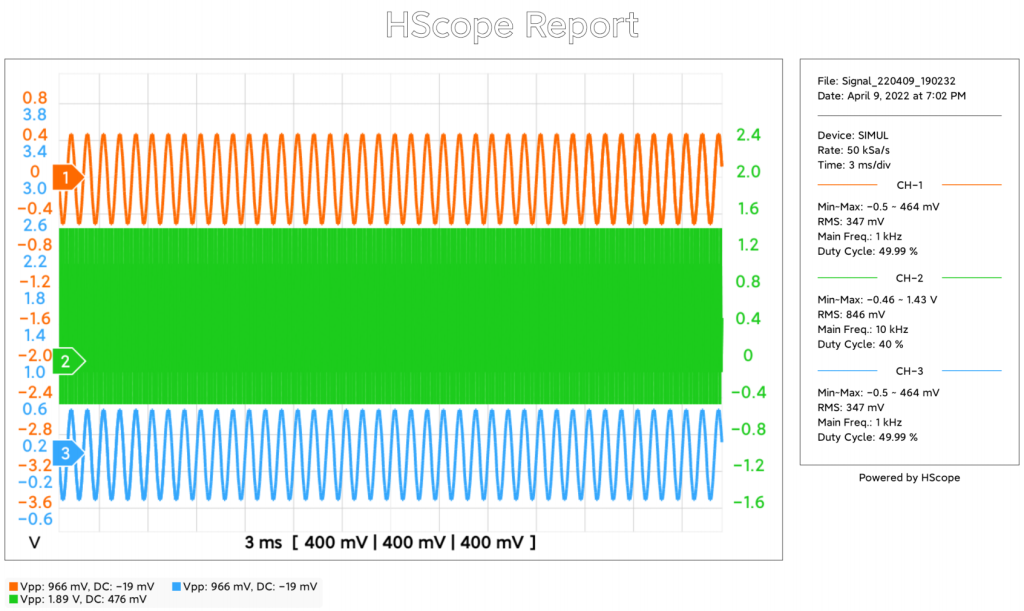
Adjusted the waveform view, then click on the report icon to generate the PDF report.
You can send the report to any other app like an email app or to a messaging app. Example of report:
In HScope Settings you can set the the Report Author name and the Report Title.
 In case you cannot see the oscilloscope with this app it won’t work with HScope. Possible reasons (check next questions for resolution):
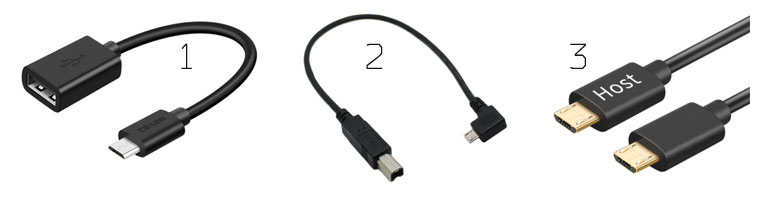
Your OTG cable may have issue if:
The suggested OTG cables are as following:
Read this if you already tested your oscilloscope / OTG cable on another phone so you are sure it is a phone related issue.
So one specific phone do not support USB OTG. Solutions:
It has been found that USB OTG can be deactivated on Android phone (until a fresh restart) when this happen:
Some user experienced problems with scrolling, the scrolling position is stuck or the scrolling is not smooth. This is due to some phone model that have problems with the touch screen while the phone is charging due to instability of power supply.
To check this issue just enable the Developer options in Android, enable the option to show the taps on screen and/or the tap coordinates. Then you will see that when the phone is charging on the screen it detect wrong taps positions.
To avoid this issue on these phones just do not operate the App when the phone is charging.
1. Base oscilloscope license fee is set by Google according to the oscilloscope model, your country currency, and promotions. Generally it is around 10% of the oscilloscope cost (gross).
2. Additional module licenses depends from the feature and may vary from 6 to 25$.
3. Every year you can get the updates when available, with an yearly fee about 6$. This fee cover all updates both on basic features and also on additional modules.
*These prices are indicative at Jan 2023 and they may be subjected to variation.
You can buy HScope licenses on Google Play Store on on Huawei App Gallery.
In case your Android device have none of them, Huawei App Gallery is the most simple option to install.
Huawei AppGallery app store is fairly lightweight and can be installed on any Android device (tested on Android 5 and higher). It can be an excellent drop replacement for Google Play Store especially for devices without Google Play services, such as DAPs (iBasso DX series, Fiio M series and etc.) or devices distributed in Mainland China. Huawei are extremely strict with app submission and verification process, so trash apps will not go through the review process that makes Huawei AppGallery more safer in terms of distributed app quality in comparison with Google Play Store.
HScope is distributed via Huawei AppGallery app store too and is available in most of the countries.
To install Huawei AppGallery app store:
Scroll down the menu of buttons on the right and click on the Settings icon. You can see the License panel where you can buy the specific oscilloscope license and also additional modules.
Module licenses are charged 1 time and are valid for all oscilloscope models.
According Google licensing policy licenses belong to a Google Account and not to a specific android device. Whatever device (even future) where you set the same google account as primary account and synchronised with Google will get the same licenses.
At January 2022 HScope licenses (Oscilloscope base license and additional Modules license) are charged 1 time and keep unlimited validity. When you buy a license you can use all the features provided by that license plus free updates for the new features released within 1 year from the purchase.
New features released 1 year after the last license purchase date will require to purchase an yearly update which will provide all the features up to the current date, plus free updates for the new features released within 1 year from the purchase date of the update.
HScope LOUNGE – Meet other practitioners, mechanics, electricians and engineers and share practices and experiments.
HScope AUTOMOTIVE – After you enter the main channel (LOUNGE) you can find on the top pinned message the link for the automotive group with specific topics and discussions.
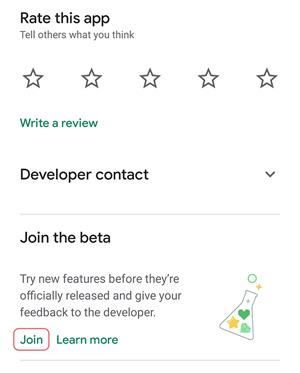
Beta version of the app includes latest add-ons to be tested by a small group. This version of the app may be not stable and still need the license to work. Progresses are tracked here.
To enable the Beta, go on Google Play, open HScope page, then push the Join button. Once activated the Beta you will see the possibility to update the app (it may require some time).
In the System Settings you can see your device information.
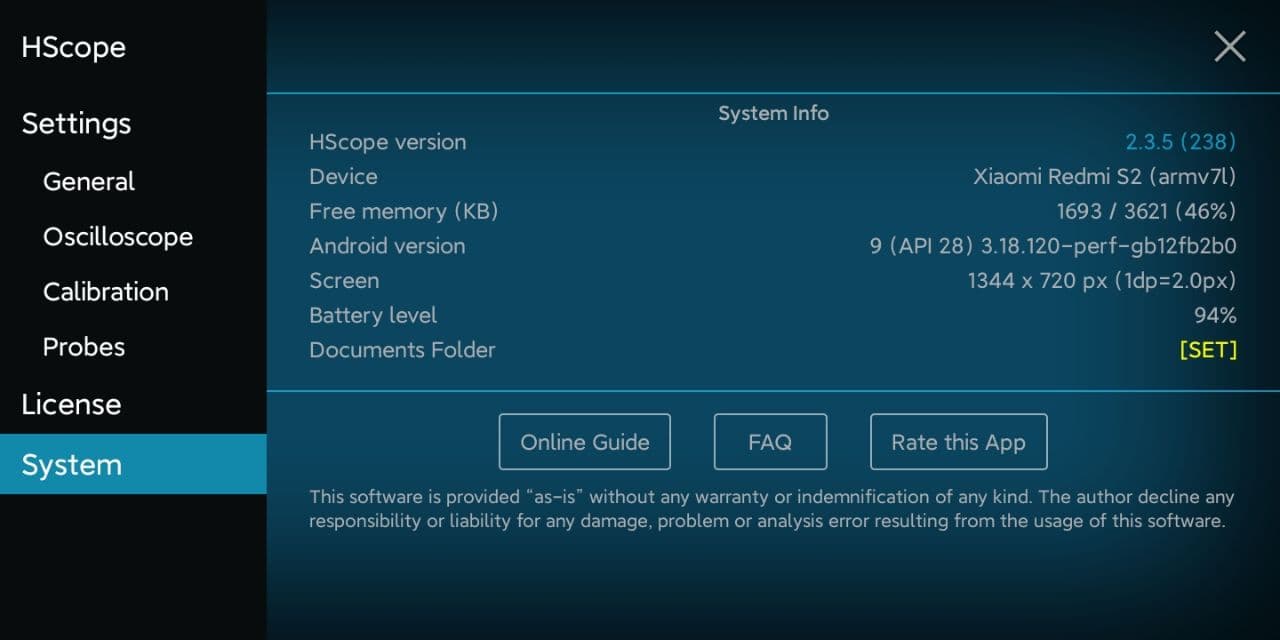
You need to set the Documents Folder in order to save the app configurations and waveform data safely in a public folder of your phone.
You can create and select this folder in your Documents or Download folder (ie. HScope under /Documents/). After creating the app data folder just select it and confirm.
Select the existing HScope folder under /Downloads/ or /Documents/. Follow the procedure in this Guide under Introduction → Android 10+.
Click on the HScope version number to open the information about the latest app release.
You can add, remove, configure or import probes in the Settings → Probes panel.
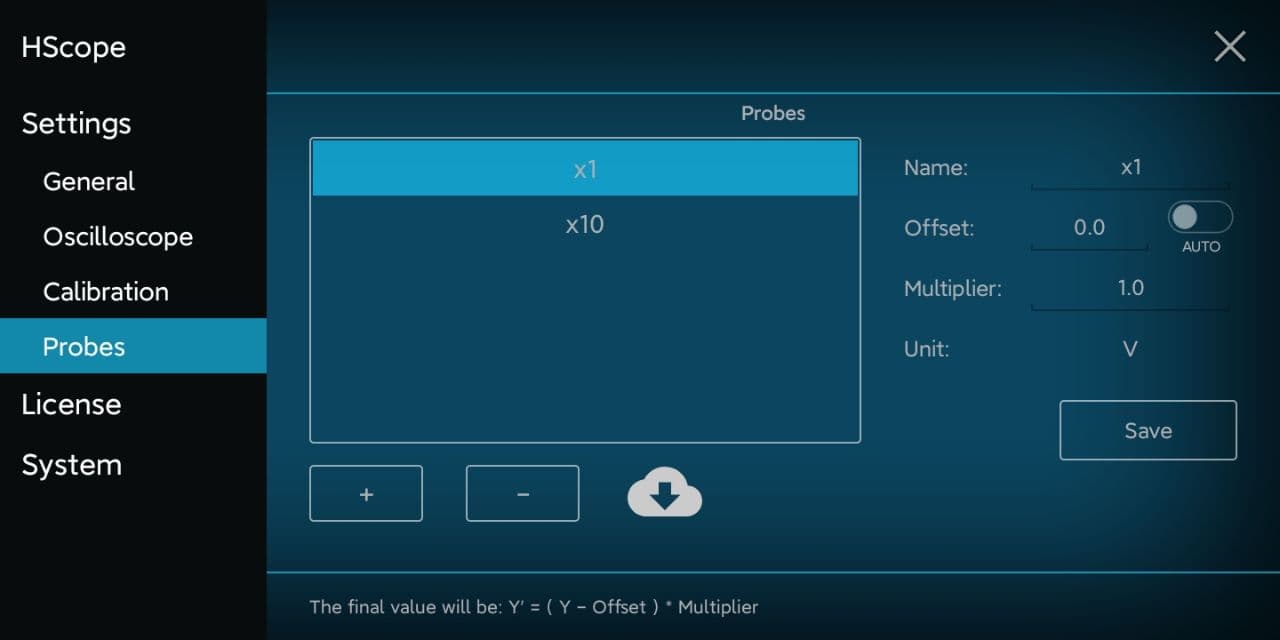
To calculate the values for a new probe you can try this online tool.
You can find a backup of your probes configuration in the Documents Folder selected in Settings → System. The backup file is called Probes.cfg (ie. /Download/HScope/Probes.cfg). HScope will automatically save the probes configuration on this file.
Warning: in case you don’t have selected a Documents Folder in Settings → System then this automatic backup won’t work.
Click on the Cloud icon to access the Import Probe screen. Here you can import probes configurations from a probe backup file or from the cloud.
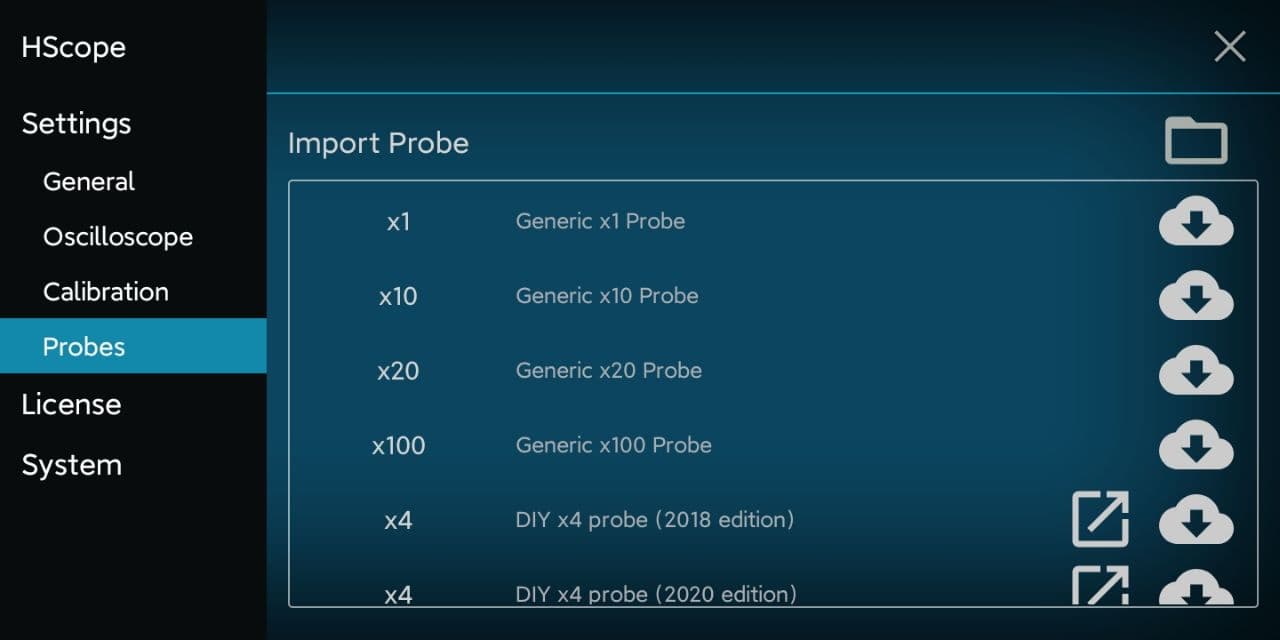
Click on the folder icon on top/right of the screen to load a saved Probes.cfg file. You can also have renamed this file (ie. Probes_2021.cfg). The important for this file is that it end with .cfg extension.
Only new probes will be imported, if a probe already exists with the same name it won’t be imported.
On the list you can download single probe configurations from common brands or DIY probes.
Click on the cloud download icon to get the probe configuration.
DIY probes are available in the cloud list with link to instruction how to build it. In case of DIY probes you can click on the arrow icon and open the page for the probe building.